Now Reading: Step-by-Step Guide to the DTF Printing Process
-
01
Step-by-Step Guide to the DTF Printing Process
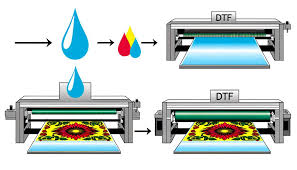
The DTF printing process consists of a number of stages which are necessary for obtaining quality prints. This guide will show you all the features starting from the transfer preparation to the design transfer application stages and you will be able to get perfect prints in every instance.
Preparing Your Design
The second step in this sequence, DTF printing, will be focusing on creating the DTF design. It is best to perform the work in design software such as Adobe Illustrator or CorelDRAW. It is very important to ensure that your design is in the right format, for instance PNG or Tiff with a transparent background so that none of the other designs shows when printed. Ensure that when designing, you have considered the print size as well as where it will appear on the garment.
Printing the Design
When designing is done, place the transfer film into the DTF printer. The following printer settings have to be adjusted accordingly for the specific film type and the output print quality. Use the advised color profile to print your design to facilitate the colors appearing is as they should be printed. After printing, please let the ink dry for a couple of minutes and then go to the next operation.
Applying the Transfer
Now take the printed film and sprinkle the adhesive powder over the ink design, ensuring that the ink is completely covered. Sprinkle a little more over the edges and over the holes, making sure that no more than necessary is used. The film should then be spun or put on hot sponge so that the area where the design is printed can be cured using a heater. After this, hold it under the water until it is entirely free of adhesive powder, and finally shake the film to eliminate extra powder.
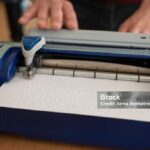
You are now ready to heat press the design into the cloth. Set your heat press to 300F (149°C); that is the standard temperature for cloth pressing. The desired printed film should now be positioned over the garment. After making sure the heat press is secure, apply force for the right amount of time. When the time is over, remove the press slowly and pull the film off when it is hot.
Post-Processing
Once the design is placed onto the garment, conduct a quality check on the garment. Confirm that the transfer has been applied properly and that the colours are bright. If time allows, do a second heat press for the design for durability purposes. Wait until the garment cools down before touching it and putting it in the package for sale.
Conclusion
The process of DTF printing may appear complicated at the beginning but with practice and proper care, you will be able to achieve excellent prints. If you stick with this step-by-step guide, you will be mastering DTF printing before long and will create designer clothes that will leave you amazed.


Related Posts


Stay Informed With the Latest & Most Important News
Previous Post
Next Post


Advertisement

Advertisement